Building iOS OCR App for Credit Card Scanning

Founder & CEO at Azoft
Reading time:
Recently, we came up with an algorithm that we hope will bring us one step closer to the next generation of payment systems that allow instant input of user’s credentials via credit card scanning. The idea for the project came to us when we happened to work with card.io — an iOS OCR app that scan and recognizes credit card numbers and expiration dates using a camera of a mobile device. We were excited to make the payment process much easier and faster, so we decided to develop a similar technology and build our own iOS OCR app.
As it stands today, we completed a large portion of the project and obtained some nice results, but the project isn’t yet finished. We’ve faced a challenging obstacle in the stage of splitting card number digits into separate blocks for further recognition and we are currently continuing our research.
Project overview
The project objective is to elaborate an algorithm that allows to recognize credit card numbers and expiration (Valid Thru) dates through an iPhone camera.
There are four stages:
- capturing a card image
- localizing — the search of a supposed area with text on the captured image
- segmentation — slitting the localized text to areas with a separate digit on each
- digits recognition.
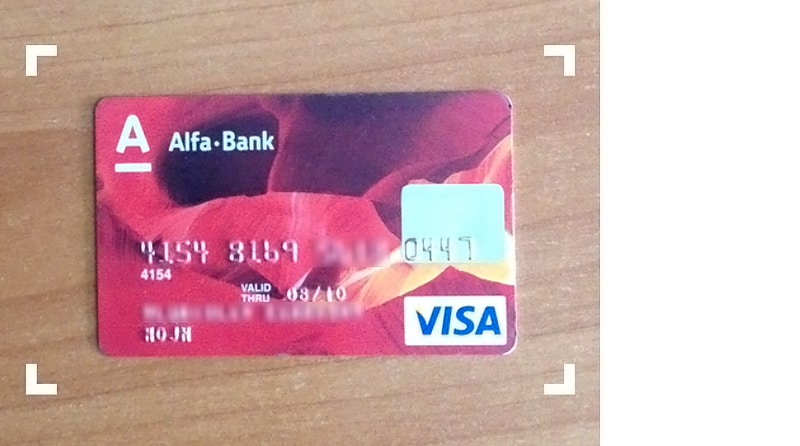
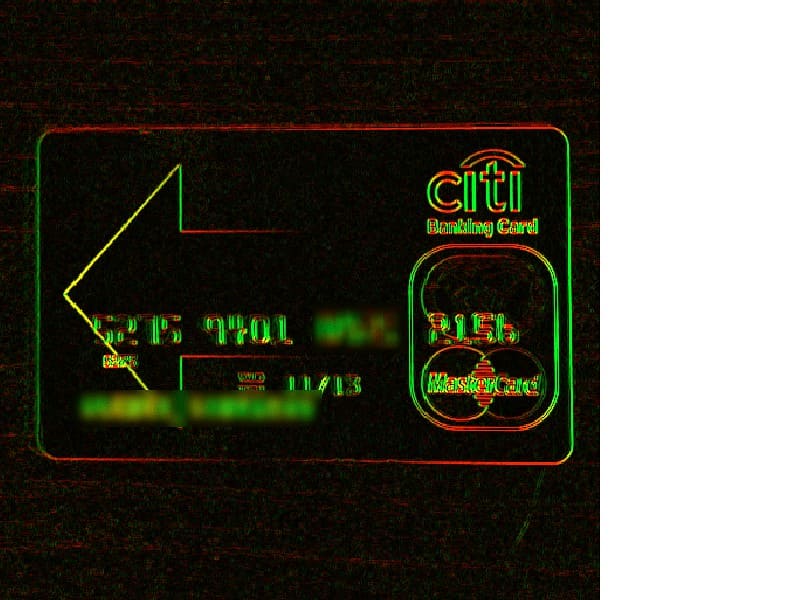
The main difficulty is that unlike ordinary text embossed digits do not contrast with the background. Moreover, many cards are decorated with background images that cross the text and create additional graphic noise. New cards that have the figures covered with silver paint are recognized relatively well. Older cards might have digits with wiped-off paint, which makes it difficult to recognize the numbers.
The other problem involves light: capturing with sharp side light results in one image, with dispersed front light — in another.
For human eyes and brain, these difficulties do not exist. Unfortunately, when it comes to a mobile device, we don’t have an extra 100 billion neurons and brain cells at our disposal. In other words, for digital optical recognition, these tasks turned to be a real challenge.
As for the bright side of things, the range of symbols is quite narrow — just from 0 to 9 and no letters. Besides, all credit cards use a standard font, where all figures differ from one another significantly (i.e. 7 does not resemble 1, etc).
Implementation
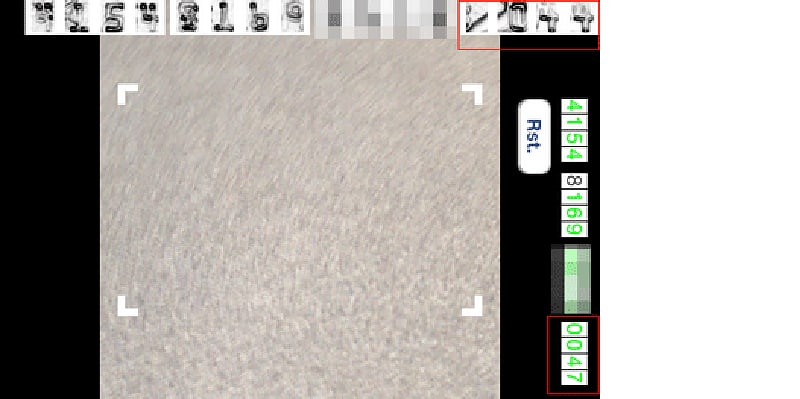
Capturing and processing the camera image
GPU, OpenGL
When the application is launched and the camera is switched on we may begin capturing the images. Captured frames are converted to OpenGL textures using CoreVideo OpenGLES Texture Cache for further processing. The processing stage is applied for every captured RGB image.
Stage 1. Saving the grayscale image as an alpha channel of an OpenGL texture.
varying highp vec2 textureCoordinate;
precision highp float;

uniform sampler2D Source;
uniform float PhotoRatioCoef;

const vec3 coef = vec3(0.299, 0.587, 0.114);

void main()
{
 vec4 textureValue = texture2D(Source, textureCoordinate);
 float gray = dot(textureValue.rgb, coef);
 gl_FragColor = vec4(textureValue.rgb, gray);
}
RGB channels from the original image are also preserved for displaying a full-colour image to a user later.
Stage 2. Edge detection.
It is assumed that the user has to position a credit card in a given area of the frame. For faster capturing, the area has a fuzzy border with a threshold, so the user doesn’t have to position the card to fit the on-screen markers exactly. The image is later warped in certain ways, such as perspective, tilt or scale correction.
The capture area is defined by a premade texture with a mask. In the mask, vertical capture areas are stored in the red channel and horizontal capture areas — in the green channel.

To detect the card borders, we perform edge detection on the entire image using the Sobel operator. In vertical areas we calculate the horizontal derivative of brightness change, and in horizontal areas — the vertical derivative. Thus, horizontal or vertical edges will only appear in the corresponding areas of the image above.
Shader code:
varying highp vec2 textureCoordinate;
precision highp float;

uniform highp sampler2D Source;
uniform highp sampler2D Mask;
uniform float Offset;


void main()
{
 vec4 NE = texture2D(Source, textureCoordinate + vec2(Offset, Offset));
 vec4 SW = texture2D(Source, textureCoordinate + vec2(-Offset, -Offset));
 vec4 NW = texture2D(Source, textureCoordinate + vec2(-Offset, Offset));
 vec4 SE = texture2D(Source, textureCoordinate + vec2(Offset, -Offset));
 vec4 S = texture2D(Source, textureCoordinate + vec2(0, -Offset));
 vec4 N = texture2D(Source, textureCoordinate + vec2(0, Offset));
 vec4 E = texture2D(Source, textureCoordinate + vec2(Offset, 0));
 vec4 W = texture2D(Source, textureCoordinate + vec2(-Offset, 0));

 vec2 gradientDirection;
 gradientDirection.x = 0.0 — SW.a — S.a*2.0 — SE.a + NW.a + N.a*2.0 + NE.a;
 gradientDirection.y = 0.0 — SW.a + SE.a — W.a*2.0 + E.a*2.0 — NW.a + NE.a;
 gradientDirection.x = gradientDirection.x*gradientDirection.x;
 gradientDirection.y = gradientDirection.y*gradientDirection.y;

 gl_FragColor = vec4(sqrt(gradientDirection.x), sqrt(gradientDirection.y), 1, 1);
}
Cropping the card: line detection
CPU, OpenCV
After the initial border detection, we need to find the actual borders of the card and align the image, because the capturing has to be done fast for user’s convenience.
At this stage, we are going to find the card border lines, their equations and their intersection points. Using the equations of the lines and the intersection points we can perform perspective, offset and scale correction, align the card to the horizontal axis and programmatically fit the image to the markers.
In the application prototype, we used the OpenCV library. This library provides a line detection method called Hough Line Transform. We also used OpenCV for adaptive binarization of detected edges. In the future, we intend to replace the algorithms provided by OpenCV with our own GPU-based implementation to increase the application performance to an acceptable level.
OpenCV for iOS doesn’t support GPU acceleration yet and the performance of this stage is relatively slow. In order to speed things up we’re going to scale down the original image here using a linear transform. After getting the Cartesian coordinates for the card’s border lines we can upscale them back to the original image size.
The actual cropping of the card is preceded by detecting 4 lines in the 4 border lookup areas. We do not process the entire image here.
It’s important to choose the border lookup areas carefully. If they are too thin edge detection may fail and the user will have a hard time pointing the camera. Wide areas, on the other hand, increase the chance of mistaking a background artifact for an edge of the card. Note, that we only look for vertical lines in the left and right areas and for horizontal lines in the top and bottom areas.
Adaptive thresholding is executed for each of the 4 areas because the following algorithms generally work with binary images. After the thresholding stage, we’re using Hough method to find the lines.

The Hough method gives us an array of lines for every area. It can be reduced by filtering out some lines, e.g. the lines whose length is below a certain threshold. After the filtering, the most evident line is chosen for the corresponding area. This procedure is run in all 4 areas. If the resulting line is found in all the areas, the frame is considered to be suitable for further processing, otherwise, it is skipped.
The lines are represented by Cartesian coordinates, so we have the equation for each of them and it is possible to find the intersection points and create a transformation for aligning the card. The alignment itself is performed using a vertex shader. Image vertices are moved to their “normal” locations according to the transformation data we acquired before.
Number segmentation and localization
GPU, OpenGL
A card number is always located in a known rectangular area on the card and the offset of digits is never more than 1 mm even on cards by completely different manufacturers. It is safe to presume that the card number will be located in the given area to a certain degree of accuracy.
Obviously, the number might be located slightly outside of the reference region, because the alignment stage does not always result in an ideally aligned image. In addition to that, the embossed digits may be slightly shifted on the card surface. Since a card number includes 4 blocks with 4 numbers, we cut them away with a 2-3 mm margin. In this article, we’re talking about Visa, MasterCard, and similar cards, but other cards such as American Express may have differently grouped numbers.
Card number splitted into blocks
Now we suppose the extracted image parts contain blocks of 4 digits that we need to localize with maximum precision. We do not know the location of digits. A digit can be located slightly higher/lower or slightly to the left/right. For quality OCR we need to crop every digit exactly to its border.
To simplify the segmentation task we’re going to split it into the following sub-tasks:
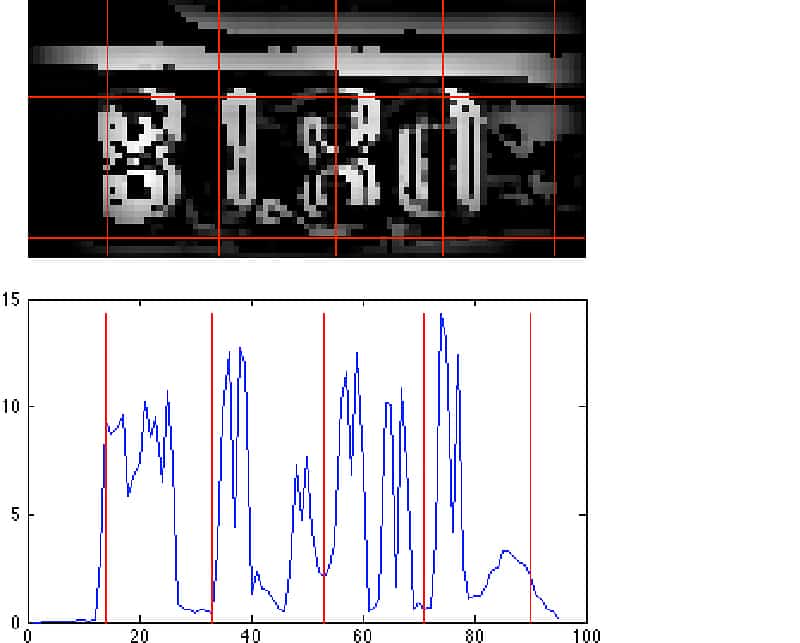
1. Digit segmentation along the Y axis
First, we have to build the histogram of horizontal brightness derivatives for the Y axis. Next, we need to find the maximum rectangle of a certain length that will match a character on the Y axis. Using this data we can cut the top and bottom margins away.

2. Digit segmentation along the X axis
As before, we have to build the histogram of vertical brightness derivatives for the X axis. The minimum rectangles (smallest values) should match the spaces between digits, so we can figure out the borders for each digit already. But the spaces may also have noise inside them, so some noise reduction is required at this stage as well. In our project we used stroke width algorithm, that produced the best results among the locally tested methods. Unfortunately it doesn’t result in 100% accurate segmentation so there is still a room for improvement.
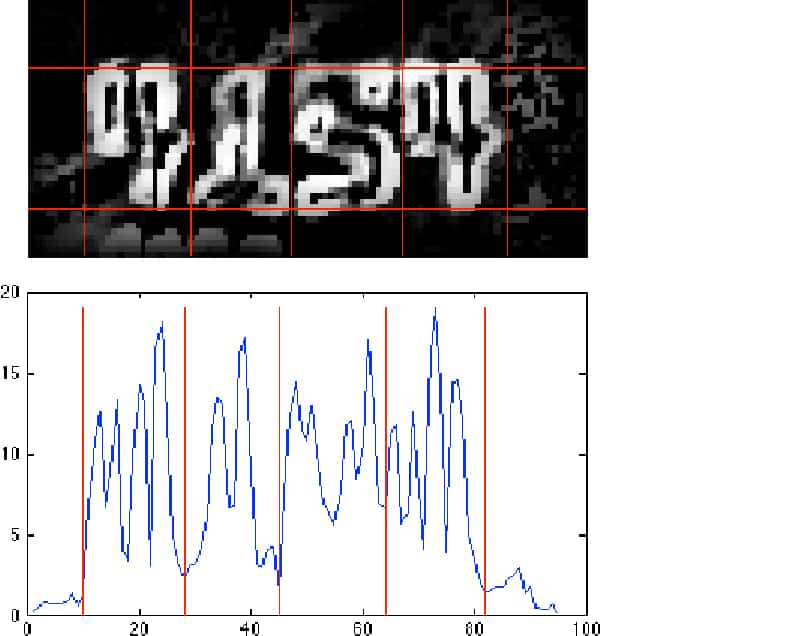
Digit segmentation is the hardest part in card number recognition. While the accuracy of segmentation along the Y axis is pretty high — 95%, the accuracy of segmentation along the X axis is only 70-80%. The reason for the difference is the number of digits involved. In Y segmentation 4 digits are used and if a single digit is erroneously localized, the neighbouring digits will neutralize the error and help produce a consistent result. In X segmentation some character strokes may be lost, e.g. the horizontal line in number 7. Localization is a process that requires high precision for good results.
Besides, card backgrounds, lighting and other factors may result in blurred digit borders and inaccurate detection. Certain artifacts can also induce false digit regions if not removed.
Digit recognition using neural networks
GPU, OpenGL
For the final segmentation we’re going to use a neural network. Image recognition is a popular application for neural networks. A neural network is a system of connected processors or artificial neurons, each of them transforming a set of incoming signals to an output signal. The key benefit of using neural networks is learning ability — neural networks can collect and use previously collected experience.
A neural layer is a set of one or more neurons not connected to each other, but connected to other neurons. A neural network can have one or several layers. Our application requires a multi-layer convolutional neural network. A multi-layer network consists of a series of connected layers, where every neuron in a layer is connected to all the neurons in the previous layer with its inputs and with all the neurons in the next layer with its outputs. The learning mechanism for multi-layer neural networks is generally an error distribution algorithm that uses gradient descent optimization.
At the final stage of recognition, when the digits are segmented, we have 16 blocks of raster data that are passed down to the convolutional neural network, that is based on an algorithm by published by Yann LeCun, Leon Bottou, Yoshua Bengio and Patrick Haffner. The network is trained by a specially written app that finds digits on real cards, groups them by the actual digit and saves digits as images. The digits bank currently has nearly 3,500 images which is enough for prototyping and testing. The production bank will include 60,000-100,000 images, but the precision of the last stage looks good even with the smaller bank: we got only 2 errors per 100 test samples.
Image in the digits bank
Digit recognition for a block results in an array of probabilities of different digits appearing in the block.
An array of probabilities for a correctly recognized sample 6:
![]()
0 : -1.021
1 : -1.000
2 : -1.016
3 : -0.945
4 : -1.022
5 : -1.033
6 : +1.002
7 : -0.992
8 : -0.995
9 : -1.009
If the probabilities for some digits don’t look good enough to be sure, we store the exactly recognized digits and try to recognize ambiguous digits in the next capture frame. A digit is considered to be well recognized if its probability is higher than a given threshold.
Conclusion
Fixing inaccurate digits segmentation, especially along the X axis, is the main priority for the current stage of the project, since the wrongly splitted blocks are the reason of the most fails in digits recognition.
We continue working on the project and will keep you informed on the results we get. If you have worked on similar tasks we will appreciate if you could share your approaches to digits segmentation and the results you received.


Comments