How to Configure a Postfix when Setting up a Custom Mailing Server

IT copywriter
Reading time:
One of our recent projects was a web app that tracks and manages user progress. To perform these tasks quickly and efficiently we developed a custom mailing system.
The server had to process multiple email attachments like PDF or text files. Also we sended transactional emails with confirmation.
These “achievement confirmations” could be done in two ways: via a web app interface, or via email. To implement the latter option, we utilized a Postfix mail server requiring custom configuration.
Here’s how we made it work.
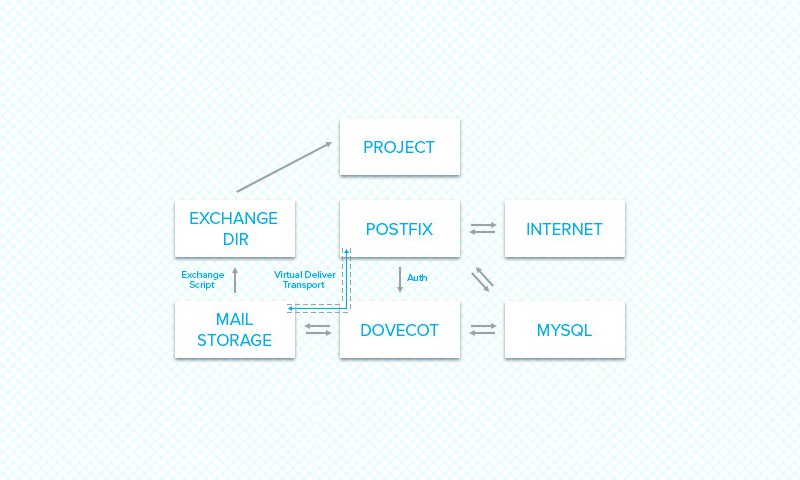
Custom mailing system: Task overview
Our goal was to add the following functions to the project backend:
- creating temporary mail aliases;
- processing mail on the basis of MySQL table rules.
Challenge
Right after we’ve started beta testing, we found a performance bottleneck. The cause was in the “classic scheme” we used to create users and temporary mailboxes: the procedure of mailbox generation along with further compilation of a hash card for Postfix and restarting the service was so source-greedy that at a certain load point our server stopped serving users and was preoccupied solely by restarting. The user creation procedure was even more source-intense.
Solution
We’ve sold the problem by moving all files to MySQL DBMS. In this case, all user data can be changed in real time as the MTA service doesn’t assume that this should be done only by admin.
To make this solution universal, PostfixAdmin package was installed; this article covers v. 2.3.7.
Components
- Postfix, but you can use any other MTA: Sendmail, Exim, etc.
- Dovecot — for authorization and mail storing; storage model — maildir.
PHP script
The only thing we have to implement in this app is reading new mails and retrieving data from them; besides, we want this code to be executed by cron. So to allow cron execute this code, we will create a Symfony command. Every bundle has the “Command” directory; our command will be placed there. Lets name it CheckMailsCommand: create CheckMailCommand.php file inside the Command directory of the bundle you work in (in our case its APIBundle, so we have the following path to the command file: src/Azoft/APIBundle/Command/CheckMailsCommand.php).
Below is what your command may look like:
namespace Azoft\APIBundle\Command;

use Symfony\Bundle\FrameworkBundle\Command\ContainerAwareCommand;
use Symfony\Component\Console\Input\InputInterface;
use Symfony\Component\Console\Output\OutputInterface;
use Symfony\Component\Finder\Finder;
use Monolog\Logger;
use Monolog\Handler\StreamHandler;

class CheckMailsCommand extends ContainerAwareCommand
{
 protected function configure()
 {
 $this->setName(‘azoft:check-mails')
 ->setDescription('Check out incoming emails and managing user actions.');
 }

 protected function execute(InputInterface $input, OutputInterface $output)
 {
 $container = $this->getContainer();

 // as you can see we are using Logger to log everything during executing this command
 $logger = new Logger('mails_checker');
 $logger->pushHandler(new StreamHandler($container->parameters['mails_checker_log']), Logger::WARNING);

 // for passing through the files we are using Finder class
 $finder = new Finder();
 $finder->files()->name('*.new')->in($container->parameters['mails_dir']);
 $filesNum = $finder->count();
 if($filesNum == 0) {
 $result = sprintf("Nothing to process");
 $logger->addInfo($result);

 return false;
 }
 foreach($finder as $fileKey => $file) {
 // to get mail content we’re using ZendMail class
 // in our application it looks like this:
 $mailContent = $container->get('zend_mail')->fetch($file);
 // where ‘zend_mail’ is a service which had been registered before

 // here should be placed some business logic
 // you may need to do something less or more useful with mails: for example, remove processed mail or something
 }
 // here you can log some result info about checking mails: something like “n mails have been successfully processed”
 }
}
It is pretty easy to execute this command:
<path_to_your_project>/app/console azoft:check-mails
Using ZendMail to process emails
Before using ZendMail class in your application you have to install it. Add this line into your composer.json:
"zendframework/zend-mail" : "2.0.*"
Then you can use it without any custom wrapper (like your own service) — you can use ZendMail class directly inside the command. But I prefer to create a wrapper for such purposes.
My ZendMail class looks like this:
<?php

namespace Azoft\APIBundle\Zend;

class ZendMail
{
 private $fetchResponse = array(
 'from' => '',
 'to' => '',
 'body' => '',
 'attachments' => array()
 );

 public function fetch($file)
 {
 $content = $file->getContents();
 $email = new \Zend\Mail\Storage\Message(array('raw' => $content));
 $headers = $email->getHeaders();
 if(($headers instanceof \Zend\Mail\Headers) === false) {
 throw new \Exception('Header info cannot be retrieved');
 }

 $this->fetchResponse['to'] = $email->getHeaders()->get('to')->getFieldValue();

 if($email->isMultipart()) {
 foreach (new \RecursiveIteratorIterator($email) as $key => $part) {
 // do something with this very mail part
 }
 }

 return $this->fetchResponse;
 }
}
Installing packages
sudo apt-get install \
dovecot-core \
dovecot-postfix \
dovecot-mysql \
postfix \
postfix-mysql \
mysql-server \
mysql-client \
apache2 \
php5 \
php5-mysql \
libapache2-mod-php5
Note: the apt-get command works only in Debian and Ubuntu; use the command that works in your Linux distribution.
Creating users
groupadd -g 5000 virtual
useradd -g 5000 -u 5000 -m virtual
Both transports and users will be working under this user.
Creating database
Create the root password:
mysqladmin -u root password VeryStrongPassword
mysql -uroot -p
mysql> CREATE DATABASE postfix;
#now, creating new user
mysql> CREATE USER 'postfix'@'localhost' IDENTIFIED BY 'password';
mysql> GRANT ALL PRIVILEGES ON postfix . * TO 'postfix'@'localhost';
mysql> FLUSH PRIVILEGES;
Configuring Postfix
To make Postfix work, edit main.cf, master.cf and create hash maps. The configuration below is for virtual transport only.
append to your main.cf
main.cf
virtual_mailbox_domains = proxy:mysql:/etc/postfix/mysql_virtual_mailbox_domains.cf
virtual_mailbox_base = /home/mail
virtual_alias_maps = mysql:/etc/postfix/mysql_virtual_alias_maps.cf
virtual_mailbox_maps = mysql:/etc/postfix/mysql_virtual_mailbox_maps.cf
virtual_minimum_uid = 100
virtual_uid_maps = static:5000
virtual_gid_maps = static:5000
mynetworks = 127.0.0.0/8, <your-network-list> recipient_delimiter = + inet_interfaces = all smtpd_sasl_auth_enable = yes smtpd_sasl_type = dovecot smtpd_sasl_path = inet:127.0.0.1:12345 virtual_transport = dovecot relay_domains = proxy:mysql:/etc/postfix/mysql_relay_domains.cf smtpd_sasl_authenticated_header = yes maximal_queue_lifetime = 4h bounce_queue_lifetime = 4h spf_received_header = yes debug_peer_list = 127.0.0.1</your-network-list>
Files required for this configuration:
mysql_relay_domains.cf
password = password
hosts = 127.0.0.1
dbname = postfix
query = SELECT domain FROM domain WHERE domain = '%s' AND backupmx = 1 AND active = 1
mysql_transport.cf
user = postfix
password = password
hosts = 127.0.0.1
dbname = postfix
table = domain
select_field = transport
where_field = domain
mysql_virtual_alias_maps.cf
user = postfix
password = password
hosts = 127.0.0.1
dbname = postfix
query = SELECT goto FROM alias WHERE address='%s' AND active = true
mysql_virtual_mailbox_domains.cf
user = postfix
password = password
hosts = 127.0.0.1
dbname = postfix
query = SELECT domain FROM domain WHERE domain='%s' AND backupmx
mysql_virtual_mailbox_limits.cf
user = postfix
password = password
hosts = 127.0.0.1
dbname = postfix
query = SELECT quota FROM mailbox WHERE username='%s' AND active
Installing PostfixAdmin
Download the most recent version from the project site. Unpack the archive to the working directory on the web server.
Note: The configuration above was made for v. 2.3.
Editing config.inc.php:
$CONF['configured'] = true;
$CONF['setup_password'] = 'changeme';
$CONF['postfix_admin_url'] = 'your instance url';
$CONF['database_type'] = 'mysql';
$CONF['database_host'] = 'localhost';
$CONF['database_user'] = 'postfix';
$CONF['database_password'] = 'password';
$CONF['database_name'] = 'postfix';
$CONF['admin_email'] = 'postmaster@change-this-to-your.domain.tld';

$CONF['encrypt'] = 'md5crypt';

$CONF['default_aliases'] = array (
 'abuse' => 'abuse@change-this-to-your.domain.tld',
 'hostmaster' => 'hostmaster@change-this-to-your.domain.tld',
 'postmaster' => 'postmaster@change-this-to-your.domain.tld',
 'webmaster' => 'webmaster@change-this-to-your.domain.tld'
);

$CONF['domain_path'] = 'YES';
$CONF['vacation_domain'] = 'autoreply.change-this-to-your.domain.tld';

$CONF['user_footer_link'] = "http://change-this-to-your.domain.tld/main";

$CONF['show_footer_text'] = 'YES';
$CONF['footer_text'] = 'Return to change-this-to-your.domain.tld';
$CONF['footer_link'] = 'http://change-this-to-your.domain.tld';
Uncomment extra patamerters, this will allow to work with data without using the command line.
$CONF['mailbox_postcreation_script']='sudo -u virtual /usr/local/bin/postfixadmin-mailbox-postcreation.sh';

$CONF['mailbox_postedit_script']='sudo -u virtual /usr/local/bin/postfixadmin-mailbox-postedit.sh';

$CONF['mailbox_postdeletion_script']='sudo -u virtual /usr/local/bin/postfixadmin-mailbox-postdeletion.sh';

$CONF['domain_postcreation_script']='sudo -u virtual /usr/local/bin/postfixadmin-domain-postcreation.sh';

$CONF['domain_postdeletion_script']='sudo -u virtual /usr/local/bin/postfixadmin-domain-postdeletion.sh';
Enter the setup password and fill-in the fields; when the installation is over, delete or rename setup.php and go to the admin pane. There we create a server, users and set all the necessary settings.


Comments