4 Android Development Tools You’d Better Use

IT copywriter
Reading time:
Mobile app development is a long and labor-intensive process. However, businesses these days want to release apps as soon as possible. Fortunately, there are plenty of tools intended for mobile developers to accelerate the pace of their work.
The available toolset is updated and expanded with every new version of mobile platforms. Nevertheless, it’s hard to keep track of all the innovations. And the same applies to additional features that aren’t usually announced, although they can be very useful for routine work.
In particular, while creating a mobile app every Android developer has to solve a range of problems. For example:
- Checking how a layout looks before running it on a device
- Running code inspection tools such as Lint; finding hardly revealed code errors before compilation
- Selecting options for bitmapped graphics for all the display resolutions and states (enabled, disabled, pressed etc.), and exporting them into different digital devices
- Detecting memory leaks during the development stage in debugging app builds
To cope with the above-mentioned tasks Android developers use various android development tools. Let’s dig deep into the four of the best android development tools.
1. Tools Attributes
The Task: To check what the UI elements look like at the development stage without the risk of them showing up accidentally in the final build.
The Solution: Tools Attributes helps to manage Android Studio using an extra namespace in a way so that the development framework doesn’t transmit attribute run-time versions into the final build.
It seems that an Android developer has only one way to check a finished layout — running it on a device. However, there is a great opportunity to use tools attributes built into the development framework, and in our case that is Android Studio.
We can distinguish two main categories of tools attributes:
- Lint attributes
- Design attributes
As a static analysis tool, Lint is used in many programming languages and software platforms. Applying Lint attributes helps to coordinate the Lint work whenever it is necessary.
Here are some specific Lint Attributes:
tools:ignore
The tools:ignore attribute allows you to set up the Lint tool to suppress warnings on specific attributes in the XML file. For example:
tools:ignore="ContentDescription"
Basically the tools:ignore is similar to Java’s @SupressWarning annotation.
• tools:targetApi
The tools:targetApi works the same way as the @TargetApi annotation and it shows the minimum API version an app is going to use. For instance, if you are applying Android KitKat, and minimum API version in your project is 21. In this case, you should simply write down to the code the tools:targetApi with the number of the version that is appropriate for you. It helps to avoid annoying Lint warnings.
• tools:locale
This attribute helps you to configure a language and turn off the Lint warning about wrong spelling. For example, if your strings consist of only Spanish text, then you can make a configuration “Spanish is default”:
<resources xmlns:tools="http://schemas.android.com/tools" tools:locale="es">
Thus, you will have Spanish set as the default language and spell-check.
Concerning Design Attributes, they can considerably facilitate layout creation in XML in the development framework.
Design Attributes include:
• tools:context
The tools:context is used to show the development framework what activity class is picked for implementing the layout. Using this attribute, Android Studio chooses the necessary theme for the preview automatically.
• tools:showIn
The tools:showIn attribute helps to point out which of the layouts is intended to display in the preview. For example:
tools:showIn="@layout/activity_main"
By doing so, a developer says to the framework what specific layout to inflate in that place.
• tools:listitem, listheader, listfooter
You can easily adjust the view of the components with specific layouts for the separate elements of the list, header, and footer. For example:
• tools:layout
Using the tools:layout attribute, you can display a fragment tag layout on the screen at the runtime:
tools:layout="@android:layout/list_content"
Thus, Tools Attributes helps developers to make sure that they will always be protected from the risk of displaying temporary text in the final app build.
2. Support Annotations
The Task: To check the code for possible errors prior to compilation and to get a full review in case of errors.
The Solution: Android Support Library annotations help Android Studio to improve the code. It works starting with Android Studio 1.3.0. Regarding previous versions, you need to plug annotations separately.
The Android Support Annotations Library allows you to find bugs in apps under development. Adding annotations to the project, a developer can make the task of keeping pure code easier.
Support Annotations can be divided into:
• Nullness Annotations
@Nullable, @NonNull
The Nullness Annotations aim to check the nullness. They can be applied for code fields, parameters, and methods. The main difference of using these annotations with a complete absence of annotations is that the nullness annotations define only whether a variable has the “null” value or not.
• Resource Annotations
@StringRes, @DrawableRes, @ColorRes
While coding, mobile developers often refer to resources of strings, images, etc. Using resource annotations, you can enforce the typed text. For instance, by adding the resource annotation @ColorRes you will get the framework warning if you try to enter the color code instead of the reference to resource ID. Without the annotation, IDE doesn’t react because the code and the reference to resource ID are the expected types of int.
• ColorInt Annotation
@ColorInt
The @ColorInt is the opposite annotation to the @ColorRes. In this case, you define that method should refer not to the resource ID but to the specific color. Applying the @ColorInt annotation you find an error quickly if the method appeals to the color resource ID.
• Thread Annotations
@UiThread, @MainThread, @WorkerThread, @BinderThread
These annotations are intended to determine the connection between a method and a specific type of thread.
• Value Constraint Annotations
@Size(min = 5), @IntRange(from = 0, to = 12), @FloatRange(…)
It is almost impossible to use only normal values of parameters while coding. To define the ranges of possible values you can add the @IntRange or the @FloatRange annotations. If you’d like to limit the sizes or length of strings in the data arrays, collections or threads, the @Size annotation will be a perfect tool for this.
• Permission Annotations
@RequestPremission(Manifest.permission.ACCESS_FINE_LOCATION)
Using Permission Annotations, you can validate one permission or a list of the permissions. It provides the confirmation that every time an app refers to the method, the list of the permissions will be available for you. If the permission doesn’t exist, you can find an error in the code.
• CallSuper Annotation
@CallSuper
This annotation is used when you need to call the super implementation of the method.
• Enumerated Annotations
IntDef and StringDef
This type of annotations allows creating generalized definitions for replacing some of the enumerated constant values. For example, you have IceCreamFlavourManager class, which includes 3 possible models: VANILLA, CHOCOLATE and STRAWBERRY. Using @IntDef you can create a new annotation called @Flavour and define its specific values.
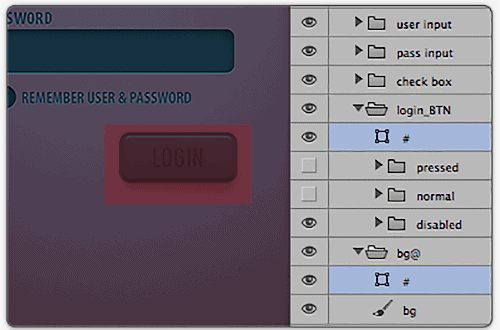
3. Cut&Slice me
The Task: To receive the options of bitmapped graphics for all the display resolutions.
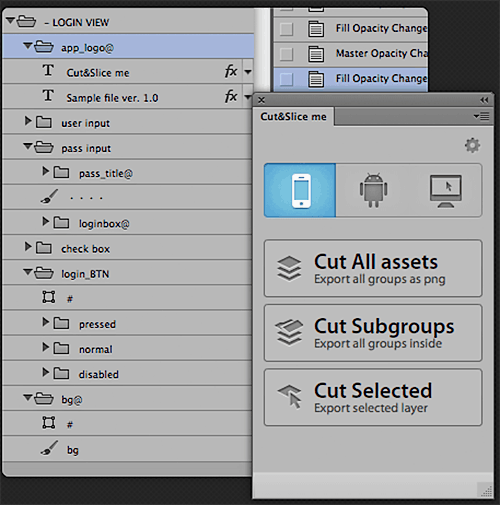
The Solution: The Photoshop plugin Cut&Slice me allows generating the cut of bitmapped graphics just by pressing a button. It’s implemented for all display resolutions and states (enabled, disabled, pressed). Resources are transmitted into different folders automatically for Android (drawable-xxhdpi, drawable-xhdpi, ..), correct name prefixes are created for iOS (@2x, @3x).
We actively use the plugin Cut&Slice me from 2013. It continues to be popular for Android as well as iOS developers.
4. LeakCanary
The Task: To detect memory leaks in time in order to prevent the OutOfMemoryError crashes and to lower the risk of the app runing out of memory.
The Solution: The library LeakCanary helps to detect memory leaks during runtime in the debug builds and provides comfortable UI for the stacktrace history.
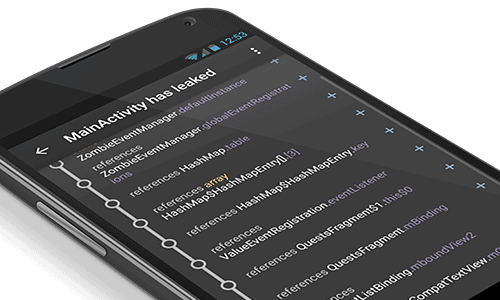
Most of the time developers have to find memory leaks manually. First, they reveal the OutOfMemoryError crashes. Then using different devices, they try to reproduce the problem that can lead to the error. Furthermore, they aim to follow the sequence of actions that caused the leak. They create a memory dump and study it thoroughly to find objects that should have been garbage collected. Then they make the shortest reference paths from the objects to the garbage collector roots and, finally, they get the reference that provoked the memory leak.
LeakCanary allows automating all the search studies and finding all the leaks very quickly. An additional advantage relates to the ability to send data about the leaks to a server and exclude the reflection references and particular activities from the method.
To summarize, we can say that Android developers have a variety of different tools for facilitating the app development process. In particular, there is a range of available solutions that are forgotten or even unknown for mobile developers, such as Tools Attributes, Support Annotations, Cut&Slice me, LeakCanary, and bug reporting systems. The choice of the toolset essentially depends on the personal preferences of developers or on the project circumstances.
If you’d like to tell me about your must-have tools, you can share it in the comments. We’d love to hear from you.
May the clean code be with you!


Comments